
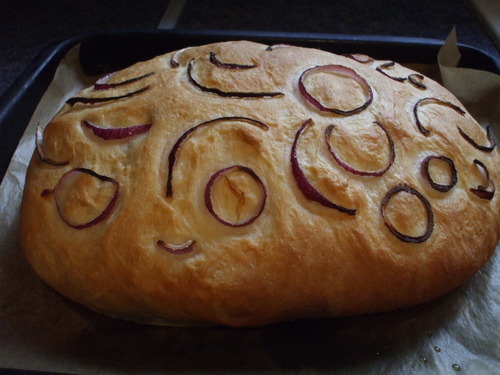
Yes, it is HUGE, though funnily enough I do use the same quantity of flour as I do with the other breads I regularly make. But I love the prettiness of this bread - I think the onions on top look so unusual and attractive. And of course they make it extra yummy, too, of course, lending a slight sweetness to the bread itself, which is equally balanced by the saltiness brought on if you sprinkle on just a little salt on the crust before baking. You don't have to add the salt though if you are health conscious. Though I usually do without guilt - I know I can't boast about my diet being low in sugar or anything (oh, well... ) but I CAN say that my diet IS low in salt and so I'm standing by that. :)
Anyway, this is a lovely bread, and well worth making, and just looks so impressive and smells absolutely divine...I like to serve it warm, cutting it in half lengthways before then cutting it into little slices and chucking the whole lot in a serving bowl, so people can just dive in. IF there is any leftover...any remaining pieces can be frozen...to be enjoyed at a later date ;)
Ingredients
- 400 g strong white bread flour
- 1 tsp salt, plus extra for top of loaf
- 1 tsp caster sugar
- 1 ½ tsp easy-blend yeast / 7 g sachet instant yeast
- About 300 ml tepid water
- 5 tbsp olive oil
- ½ red onion
Method
- Sift the flour and salt into a big mixing bowl and stir in the sugar and the yeast.
- Make a little well in the centre and add 3 tbsp of the olive oil. Pour in most of the warm water. Using your hands, bring the mixture together to form a smooth, soft dough. It should be slightly moist but not too sticky. Add a little more water if it feels too dry, or, if it is too sticky, add just a very small amount of flour. Sprinkle your work surface very lightly with flour.
- Turn the dough out onto the work surface and knead for about 10 minutes until smooth-skinned, supple and elastic. Lightly grease a bowl with a little olive oil. Roll the dough into a ball and place in the bowl, turning once to grease the top. cover with greased clingfilm.
- Leave the dough to rise in a warm, draught free place for about 2 hours until it has doubled in size and feels springy to the touch if you very lightly press it with a finger.
- Grease a big baking tray and line with baking paper if it is not non-stick.
- Remove the clingfilm and give the inflated dough a big punch with your fist to knock out all the air. Turn out onto a very lightly floured work surface and knead very briefly for about a minute.
- shape the dough into a smooth-sided rugby ball by first rolling it out with a rolling pin to form an oval. Then fold the two long sides of the oval underneath, plumping the dough with very lightly floured hands. Place on a baking tray with the crack underneath. Press down with your hands to flatten the rugby ball slightly. Cover with the greased clingfilm once more and then put back in your nice warm spot to rise again. This should take about 1 ½ - 2 hours. (Ganache-Elf tip…be very careful when moving or carrying around the inflated dough. It is very delicate and, after having finished its second rising, you don’t want the air to be deflated again or your bread will be flat and dense. :( so transport with care…and don’t leave it in a place where it is at risk at being trodden on by inquisitive doggies or poked at by little brother, etc.)
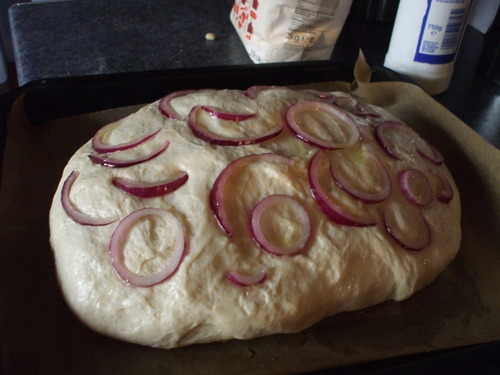
- When the dough is well-risen and has doubled in bulk again (look at my pic for reference :) ) preheat the oven to 210c/190c fan. Thinly slice the red onion.
- Take the cling film off the dough. Very gently press the thin slices/rings of onion onto the top of the dough. Drizzle over about 2 generous tbsp of olive oil and sprinkle with a little salt if desired.
- Bake in the preheated oven for 20-30 minutes, until golden brown and well risen - to test for doneness, tap on the base of the loaf; it should sound hollow if fully cooked. Remove from the oven and place on a wire rack to cool. If you like your crust nice and soft, wrap in a clean tea towel before leaving to cool. It's gorgeous eaten warm, with perhaps a little olive oil alongside for slathering on each slice. NOM.
No comments:
Post a Comment