
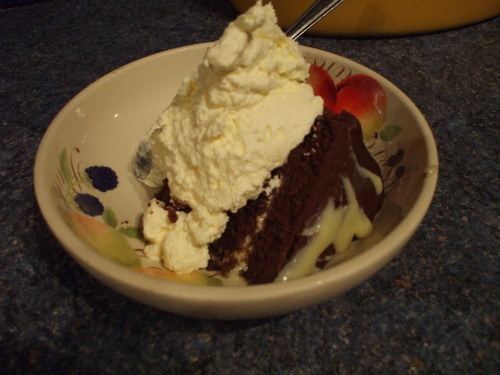
I wanted to make my little brother something extra special today, as this weekend he is moving out to live in Dublin for his first year of college :( yes, it will certainly be quite a sad weekend for Ganache-Elf…but before I go all sentimental on you, let’s talk about this cake. What with the whipped cream and two different types of ganache, healthy it most certainly is NOT. But delicious? Of course. And it looks awesome when it’s all assembled, so make sure to put it on the table before cutting into it so you can bask in all the admiring “oooh”s and “aah”s thus evoked.
For the cake:
- 225 g margarine/butter, softened
- 225 g caster sugar
- 4 large eggs
- 200 g self-raising flour
- 25 g cocoa powder
- 4-5 tbsp hot water
- A few drops of milk if needed
- 2 tsp baking powder
For the filling: 125 ml whipping/double cream
For the ganache(s ;) ):
- For the white choc ganache: 100 g white chocolate and 4 tbsp single cream
- For the dark choc ganache: 150 plain chocolate and 150 ml single cream
Method
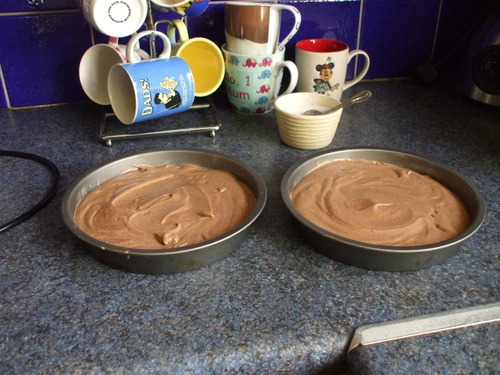
- Preheat oven to 180c/fan 160c. Grease 2 sandwich tins that are 20 cm in diameter. Line the bases with baking paper.
- Blend the sifted cocoa powder with the hot water in a large bowl to get a thick chocolatey paste. Add the margarine, sugar, eggs, flour and baking powder and beat well with an electric mixer for about 3 minutes until smooth and well-blended. After two minutes pause the mixer and scrape down the sides of the bowl with a metal spoon or a spatula so it’s all nicely incorporated.
- Spoon up a little of the mixture and let it fall back into the bowl to check that it is of a nice dropping consistency – it should slide easily back into the bowl. Add a few drops of milk if required.
- Divide the mixture equally amongst the two tins and smooth the surfaces with the back of a spoon or a palette knife.
- Bake for 20-25 minutes until the sponges are well-risen and springy to the touch when pressed gently with a fingertip: if a slight indentation is left when you remove your fingertip, then bake for another few minutes or so before testing again.
- Remove from the oven and leave in the tins for about three minutes before turning out onto a wire rack. Wait another minute, then gently peel off the baking paper. Leave to cool completely.
For the filling and ganaches. ;)
- Make the dark choc ganache by melting the chocolate with 150 ml single cream, on a very low heat in a small saucepan. Stir until smooth and then refrigerate for about 1 ½ - 2 hours, checking after 1 ½ hours…you don’t want it very hard, just a nice spreadable consistency.
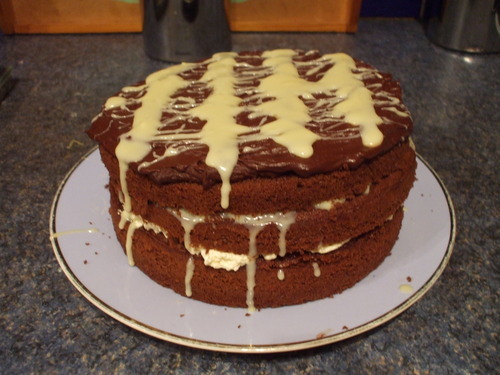
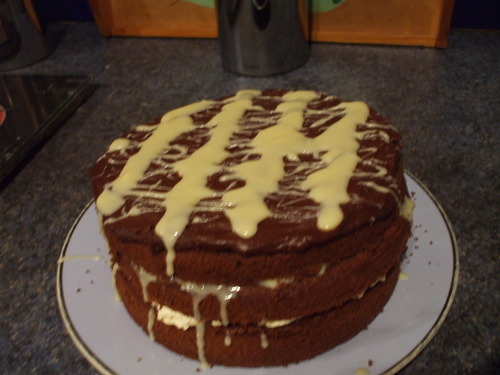
- Next make the white choc ganache: in a small heatproof bowl set over a pan of simmering water, melt the white choc with the 4 tbsp single cream. Stir now and again and watch it very closely – the white choc will temper easily if it is overheated. As soon as the choc has melted remove from the heat and stir until nice and smooth. Refrigerate for about 1 hour – 1 ½ hours, checking after an hour, until the ganache is thicker and more spreadable. (Ganache-Elf tip: I actually chilled my white choc ganache only just long enough for it to set slightly...but it was still a little on the runny side; which meant when I sandwiched the cakes together a little trickled down the sides of the cake, which I thought looked quite pretty. :) )
- Whip the 125 ml whipping/double cream until soft peaks form – but be careful not to over whip.
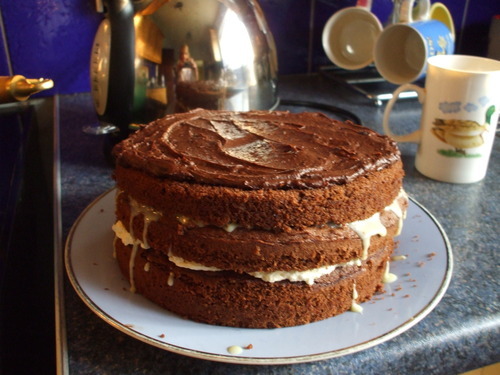
- Next compare your two sponges – if one of them is not quite as well-risen as the other, take that one and place on a plate. (if they are the same it doesn’t matter which. ;) Spread the whipped cream over the sponge on the plate.
- Take the other sponge and very, very carefully, slice it in half horizontally. Be very careful doing this: you want the two slices to be as even as possible. Be very careful handling them too as they will be quite fragile once you've cut them.
- Then place one of these slices, cut side down, onto the layer of whipped cream.
Now it is time to apply the ganache. :) I am going to outline the way I did to get the resulting cake in the pics above...but I just want to stress to you that this is most certainly NOT the only way you can do it...there are lots of pretty and decorative ways in which you can finish off your gorg gateau. ;)
- Take the white choc ganache and spread it on top of the cake so that now you have a layer of sponge, then cream, then sponge, then ganache. Reserve a small amount of the white choc ganache for drizzling and decoration.Then take the third and final sponge and place that, cut side down, on top of the white choc ganache.
- Take the dark choc ganache then and spread it over the top of the cake with a palette knife, swirling to get a pretty decorative effect. Reserve some of the ganache for decoration.
- Now to add some pretty finishing touches to turn your cake into the ultimate showstopper. ;) Here are some ideas to get you started...
- Drizzley effect: as in the pic above, after you've finished layering on the dark chocolate ganache, drizzle over the reserved white chocolate ganache to get a stripey lacey effect - use a teaspoon to do this. Put only a small amount of ganache and lift it high over the cake, using swift light movements so that only a very small amount of ganache falls upon the cake to create fine zigzag lines.
- Flakey effect: Crush one (or two...or three...etc.) Cadbury flakes, Galaxy ripples or Cadbury Twirls (as fine or as chunky as you like: or have a mixture of small and big flaky bits.) Scatter over the top of the cake.
- Rosettes of ganache: Pipe rosettes of ganache (dark or white - or use a mixture of the two :) ), using a piping bag with a fluted nozzle,on top of the cake. Just make sure the ganache is of the correct consistency for piping.
- Grated chocolate: coarsely grate a generous amount of white, dark or milk choc - or a mixture if you like - over the top of the cake. It helps to chill the chocolate before doing this.
No comments:
Post a Comment