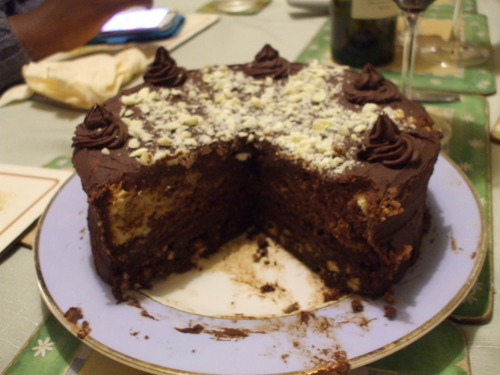
Now I must say, for some of the recipes on My Cocoa Stained Apron, I can’t claim them entirely as my own creations…for I got the idea off other recipes and made my own little changes and alterations to suit myself. BUT this is not the case with the cake above. I attempted to come up with some really awesome name for it, but I’m afraid I failed in that. And so it is simply named, somewhat boringly, as Ganache-Elf’s Biscuit Cake Sponge. Oh well, perhaps the name isn’t exactly brilliant, but that doesn’t take anything away from the cake itself, of course. You see before you cut into it anyone would think it is just an ordinary chocolate cake…but, hidden beneath all that lovely ganache lies two layers of two very different types of cake. One being, a scrumptiously light, enticingly crumbly chocolate and vanilla marbled sponge; the pretty yellow and brown shades complementing eachother beautifully and meaning that the sponge looks just as yummy as it tastes. And on the bottom…a very,very chocolatey biscuit cake layer, its crunchy, dense chocolatiness contrasting enticingly with the seductive softness of the sponge. Need I say any more…
Perhaps it is rather silly of me to reveal my “secret” recipe for the whole blogging world to see, but I don’t think, really, it would be morally right to keep it to myself. Anyway, for all I know, there are already lots of intrepid bakers out ther who have already had the very good idea of bringing together two of our most best-loved and utterly delicious cake types. But anyway, just in case you are not one of those people, and would be very, very interested in trying it out for yourself, here is the recipe. (Note…in the recipe below I made both ganache and buttercream…but it’s up to you whichever you use, really. You might want to use both or just one of each, or perhaps different flavours of buttercream or different flavours of ganache…etc. I leave that to your very capable imaginations ;)
Ganache-Elf’s Biscuit Cake Sponge. :)
Ingredients
For the sponge:
- 110 g margarine/butter, softened
- 110g caster sugar
- 1 tsp baking powder
- 110 g self-raising flour
- 2 large eggs
- 1 tbsp cocoa powder
- 2 tsp milk
- Few drops vanilla extract
- Few drops pink or red food colouring
For the biscuit cake:
- 150 g butter, cubed
- 150 g plain chocolate, broken up
- 3 large tbsp golden syrup
- 150 g digestive biscuits
- 75 g rich tea biscuits
- 25 g marshmallows, halved
- 25 g Maltesers or other small chocolates, such as Smarties or Galaxy Minstrels
For the ganache:
- 100 g plain chocolate, broken up
- 100 ml cream
For the chocolate buttercream:
- 75 g butter, softened
- 175 g icing sugar
- 1-2 tbsp cream or milk
- 1 tbsp cocoa powder
Method:
- First, make the sponge. Preheat the oven to 180 c/fan oven 160 c. Grease a 20 cm sandwich cake tin and line the bottom with baking paper.
- Put the softened butter, the sugar, baking powder, flour and eggs into a bowl. Beat well with an electric mixer until smooth and well blended. Add a few drops of water, if necessary, to create a soft dropping consistency.
- Spoon a third of the mixture into a separate bowl, and another third into another bowl, leaving the remaining third in the original bowl. Into one bowl, sift the tablespoon of cocoa powder and gently fold in with 2 teaspoons of milk.
- Tint one of the other two mixtures in the remaining bowls pink/red with a few drops of food colouring. To the one remaining mixture, mix in a few drops of vanilla extract.
- Transfer large spoonfuls of each mixture into the prepared tin. Dot the spoonfuls alternatively around the tin until each mixture is used up completely. Then use a skewer to swirl around the surface of the uncooked sponge to create a pretty marbled effect.
- Bake for 20 – 30 minutes in the preheated oven until the sponge is well-risen and springs back beneath the fingertip when pressed gently on the top. If an indent is left when you do this, bake for a few minutes more before testing again.
- Leave in the tin for a few minutes before turning out onto a wire rack, peeling off the paper and leaving to cool.
- Next, make the biscuit cake: take the very same cake tin that you used for your sponge and line this well with cling film. Crush the digestives and the rich tea biscuits in a freezer bag with a rolling pin.
- Put the plain chocolate, the butter, and the golden syrup into a large saucepan, using a heated spoon to measure out the syrup as this makes it easier to handle.
- Melt the contents of the pan over a very gentle heat, stirring occasionally until melted and smooth, and then remove from the heat.
- Cool a little before stirring in the biscuit crumbs, and then mix in the marshmallows and the maltesers/smarties/minstrels. Transfer to the prepared tin and refrigerate until set.
- For the ganache, melt the plain chocolate together very gently with the cream in a saucepan, stirring occasionally until melted and smooth. Place in the fridge for about a couple of hours until not completely set, but of a nice spreadable consistency.
- To assemble the cake, place the set biscuit cake on a plate. Spread the ganache over the biscuit cake, reserving about a quarter for piping, and place the cooled sponge on top.
- Next make the chocolate buttercream. Beat the Kerrygold butter in a bowl until very soft, then sift in the icing sugar and the cocoa powder. Add the tablespoons of cream as required and continue to beat until you have a nice spreadable icing.
- Spread the buttercream over the top and sides of the cake, again reserving a small quantity for piping. Swirl the top with a palette knife to get a pretty decorative effect.
- Use an icing bag with a fluted nozzle to pipe alternative swirls of ganache and buttercream on the top of the cake.
No comments:
Post a Comment